ARTIFACTS IN DIGITAL RADIOGRAPHY
Abstract
Digital radiography is becoming more prevalent in veterinary medicine, and with its increased use has come the recognition of a number of artifacts. Artifacts in digital radiography can decrease image quality and mask or mimic pathologic changes. They can be categorized according to the step during which they are created and include preexposure, exposure, postexposure, reading, and workstation artifacts. The recognition and understanding of artifacts in digital radiography facilitates their reduction and decreases misinterpretation. The purpose of this review is to name, describe the appearance, identify the cause, and provide methods of resolution of artifacts in digital radiography.
Introduction
With increasing use of digital radiography in veterinary medicine, numerous artifacts are being identified. Artifacts include any alteration in the image, which leads to a misrepresentation or hindered visualization of the object of interest. These artifacts must be recognized to correctly interpret digital radiographs. An understanding of how an artifact corresponds to a given step during image acquisition and display will facilitate implementation of an expedient remedy. Hardware and software troubleshooting in digital radiography differs from troubleshooting in film-screen radiography, and these differences must be understood.
Digital radiography includes all forms of radiography that incorporate a digitally processed image. These include photostimulable phosphors, direct digital radiography, and indirect digital radiography. Photostimulable phosphor systems are marketed as computed radiography (CR), and the latter two are marketed as digital radiography (DR). These systems share a number of steps in common during the imaging process. However, some unique features of each imaging system are a source of artifact seen only with the corresponding system.
Digital radiographic artifacts can be divided into the following categories corresponding to the step during which they are created: preexposure artifacts, exposure artifacts, postexposure artifacts, reading artifacts, and workstation artifacts. Identifying artifacts using standardized nomenclature facilitates the continued understanding of digital radiography as it becomes more prevalent in veterinary medicine. The purpose of this review is to name, describe the appearance, identify the cause, and provide methods of resolution of artifacts in digital radiography.
Preexposure Artifacts (Table 1)
| Artifact | Hardware | Appearance | Cause | Remedy |
|---|---|---|---|---|
| Storage scatter | CR | Decreased overall intensityDecreased image qualityMay show pattern of exposure | Exposure to scatter and background radiation | Erase imaging plates dailyProtect from scatter radiation |
| Cracks | CR | White lines or dotsOften in periphery | Physical damage to imaging plateRepeated stress or inappropriate handing | Handle imaging plates carefullyPerform scheduled maintenance and cleaningReplace imaging plates as needed |
| Partial Erasure | CR | Faint superimposition of previous image | Erasure light failureIncorrect erasure light intensity | Replace erasure lights as neededIncorporate additional ultraviolet light erasure phase |
| Phantom Image | CR | Faint superimposition of previously erased image | Prolonged time between erasure and subsequent exposure | Erase imaging plates daily |
- CR, computed radiography.
Storage Scatter
The highly sensitive imaging plates used with CR systems are more likely than conventional film to be noticeably affected by extraneous radiation exposure.1–3 Imaging plate fog due to scatter or background radiation can occur before or after exposure.4 Fog is often due to exposure to scatter radiation during other diagnostic imaging studies (Fig. 1). Storage scatter leads to an overall decrease in image quality and contrast. Objects between the source of extraneous radiation and the imaging plate can obstruct a portion of the scattered radiation and be present on the image as an area devoid of added exposure.5 This may occur with cassette storage devices or shelving units. An imaging plate should be kept outside of the imaging suite during any radiographic acquisition for which it is not used. Background radiation exposure of the highly sensitive imaging plates is often unavoidable. Erasure of imaging plates before use is recommended to eliminate storage scatter and is often done at the beginning of each workday.4
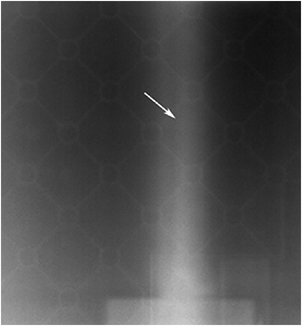
Storage scatter. A cassette was present near a patient in preparation for a horizontal radiograph. During exposure, scatter radiation was attenuated by the vertical rod of the cassette stand (arrow) and the back of the cassette before being incident upon the imaging plate. Remedy: Only the cassette utilized for the current radiograph should be present in the imaging suite during exposure. 55 × 59 mm (300 × 300 DPI)
Cracks
With CR systems, repeated transport of imaging plates through the imaging plate reader makes them susceptible to physical damage. Inadequate maintenance and inappropriate handling may also be a cause of imaging plate damage.6 Cracks in the imaging plate appear as white lines or dots that are usually located at the edge of the image.4,5,7,8 Cracks closer to the center of the imaging plate are more likely to be superimposed over a region of interest, and may mimic linear mineral opacities.7 Reducing the phosphor grain size, phosphor layer thickness, and surface protection layer are preferred for higher image resolution, but these characteristics make the imaging plate more likely to be physically damaged.5 Scheduled maintenance of the cassette, imaging plate, and imaging plate reader reduces the production of cracks. Imaging plates must be handled carefully with cotton gloves. Imaging plates with cracks that interfere with the image should be replaced.8
Partial Erasure
Imaging plates retain a portion of the latent image after being read. They are subsequently erased by light exposure. CR images created by exposure to high quantities of X-rays have a more intense latent image, which may persist after the imaging plate is read. In these instances, a greater amount of stored energy remains within the imaging plate. As such, routine exposure to visible light may be insufficient to completely erase the imaging plate.5 Technical malfunction is another cause of incomplete imaging plate erasure and may be due to electrical malfunction or burnt out, fading, or dirty light bulbs. Partial erasure is more likely with newer imaging plates, which have more stable energy storage.5 When a partially erased imaging plate is subsequently used for a radiographic study, the latent image remains on the imaging plate. It appears as a faint image superimposed over the more recent radiograph.4 Bright visible light is most commonly used for erasure and should be inspected for proper function. Ultraviolet light can be used in addition to visible light for more thorough erasure.5
Phantom Image
Shortly after imaging plate erasure, the imaging plate does not have a detectable latent image. However, if the imaging plate is not read or erased for several days or longer, the latent image from the previous radiograph may become increasingly detectable.8 The previous image appears faintly superimposed over the more recent image. When using a CR system, erasure of imaging plates is recommended before use and can be performed at the beginning of each workday.7,8
Exposure Artifacts (Table 2)
| Artifact | Hardware | Appearance | Cause | Remedy |
|---|---|---|---|---|
| Quantum mottle | DRCR | Grainy imagePoor overall image qualityUnderexposed image | Insufficient X-ray exposure | Increase exposure technique as needed |
| Paradoxical overexposure effect | DR | Overexposed areas appear lighter | Severe overexposure | Reduce exposure technique if possible |
| Planking | DR | Rectangular areas of differing intensity | Variable amplification in separate sections | Reduce exposure if possible |
| Upside-down cassette | CR | Cassette backing superimposed on the image Severe overall attenuation if cassette has lead backing | Incorrect cassette placement for exposure | Check for correct cassette orientation prior to exposure |
| Grid cutoff | DRCR | Regions of increased attenuation | Incorrect grid placement/alignment | Check for correct grid location, orientation, and distance from anode |
| Backscatter | CR | Fogging and decreased image quality in area of underlying scattering structure | Scatter from object below the cassette High exposure settingGap between scattering object and cassette | Use cassettes with lead backing |
| Double exposure | CRDR | Images from two exposures superimposed on each other | Taking multiple radiographs without erasing the cassetteMemory or transfer errors | Read imaging plates after every exposure Provide reliable mode of data transfer |
| Dead pixels | DR | White dots or lines | Nonfunctional detector element(s) | Use smoothing algorithms for few affected pixels Replace detector as needed |
- CR, computed radiography; DR, digital radiography.
Quantum Mottle
DR and CR allow for a wider range of exposures that can produce a diagnostic image, when compared with film-screen radiography. However, using an appropriate exposure technique remains important. When too few X-rays are incident on a detector or imaging plate, a grainy image may result (Fig. 2).1 The degradation in image quality is due to increased noise, predominantly quantum mottle, relative to the number of X-rays detected.9 Quantum mottle is more prevalent when there is a low signal-to-noise ratio (S:N) and may be due to the production of too few X-rays or high attenuation of X-rays by the object or grid.10 The S:N increases as the number of X-rays detected increases, because noise increases as a square root function of signal.1,11 Quantum mottle can be minimized by increasing the number of X-rays incident on the detector, while avoiding overexposure. To minimize quantum mottle artifact, technique charts should be used with settings specific for tissue thickness and the region of interest. Manufacturer's recommendations should be followed to maintain clinical technique factors (S number, IgM value, exposure index) within the preferred range. Intentional image blurring, through the use of filtering, is a method used to reduce the appearance of quantum mottle at the expense of image detail. Conversely, increasing image detail through image sharpening techniques increases the perception of quantum mottle. Image sharpness should be maintained at a reasonable level.9
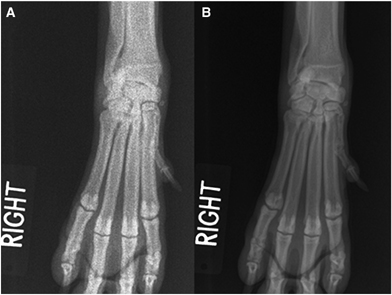
Quantum mottle. Dorsopalmar radiographs of the right manus of a dog. (A) The entire image has a grainy appearance resulting in an overall decrease in image quality. Remedy: (B) The radiograph was repeated after increased exposure settings. The grainy appearance is dramatically reduced, and image quality is improved. Note, the area surrounding the manus is more exposed.
Paradoxical Overexposure Effect
Within the diagnostic X-range, an increase in the number of incident X-rays results in a darker image. This is not necessarily true for severely overexposed images, in which areas of greater X-ray exposure may appear increasingly lighter. This artifact has been observed using indirect digital radiography, and its mechanism has not been determined. Paradoxical overexposure effect often manifests only in areas of minimal X-ray attenuation, such as the periphery of a region of interest (Fig. 3). Similar exposure may be maintained by using technique charts with lower milliampere-seconds and compensatory increased kilovoltage peak. If needed, decreasing exposure settings may reduce this artifact, but can result in underexposure of the region of interest.
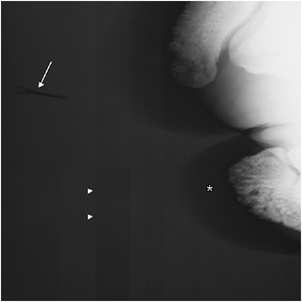
Paradoxical overexposure effect and planking. Dorsopalmar radiograph of the right distal phalanges of a rhinoceros. The more exposed background is lighter than the hoof wall (asterisk) and the adjacent needle (arrow) used to locate a fistulous tract. Well-demarcated rectangles (arrowheads) of varied shades of gray are present within the background. Remedy: Reduce exposure technique if possible.
Planking
DR systems can use multiple amplifiers for individual sections of the digital array. In overexposed regions of the image, sections using different amplifiers may appear as sharply demarcated rectangles of differing shades of gray (Fig. 3). This is referred to as planking and occurs due to variations in signal amplification that are exacerbated by high levels of exposure. Recalibration of the detector array can be performed to more uniformly amplify the X-ray signal. Using processing techniques that automatically decrease exposure values exceeding a predetermined level may decrease the appearance of artifacts associated with overexposure.
Upside-Down Cassette
The CR imaging plate can be exposed through either of its surfaces. However, the cassette must be placed with a specific surface facing the X-ray source, which is referred to as the front of the cassette. If the cassette is placed upside-down during exposure, X-rays will pass through the back of the cassette before being incident upon the imaging plate. Attenuation of X-rays will be represented by a well-defined pattern corresponding to the construction of the back of the cassette (Fig. 4).4,7 The artifact created by upside-down placement of the cassette is similar to that seen with film-screen radiographs. Correct orientation of the cassette before each exposure will avoid upside-down cassette artifact.
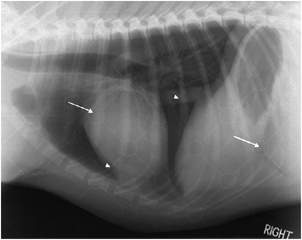
Upside-down cassette. Right lateral radiograph of the thorax of a dog. The cassette used for this radiograph has a backing made of plastic. Its structure is superimposed over the image as a series of circles (arrows) and lines (arrowheads) of increased attenuation. Remedy: Orient cassette correctly before each exposure.
Grid Cutoff
The increased sensitivity of the imaging plate or detector makes the use of a scatter reduction grid recommended for most computed and digital radiographs.7 Incorrect orientation or position of the grid relative to the X-ray source will cause attenuation of primary X-rays. An incorrectly positioned focused grid will create an attenuation pattern on the image similar to that described in film-screen radiography (Fig. 5).11 The wider dynamic range in DR and CR may allow for uniform alterations in X-ray attenuation without noticeable image degradation. Decentering of a nonfocused grid may not be apparent on digital or computed radiographs, but patterns of nonuniform attenuation remain readily recognizable. The ability to easily magnify digitized images may also make grid lines more apparent. Correct placement of scatter reduction grids will reduce these artifacts.
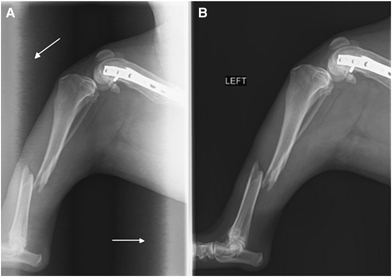
Grid cutoff. Mediolateral radiographs of a dog crus using a focused grid. (A) With the grid oriented upside-down, two borders of the image show increased attenuation, which is more severe toward the periphery (arrows). Remedy: (B) Removal and correct replacement of the grid eliminates grid cutoff and allows for more uniform exposure.
Backscatter
High-imaging plate sensitivity makes CR more susceptible to the effects of exposure due to backscatter, as compared with film-screen radiography.1,2,5,7 A fraction of the X-rays that transmit through the imaging plate strike a distant object. This is a source of scatter radiation that can return toward and expose the imaging plate. The resultant exposure may be in the shape of the object causing backscatter. Partial attenuation of the backscatter by the cassette may also create a corresponding pattern. The image is fogged except for those areas in which the back of the cassette attenuates scatter. Backscatter is most noticeable when a gap is present between the imaging plate and the source of backscatter.2 Backscatter increases with increased object thickness, field of view, and kilovoltage peak.1,2 Avoiding excessive exposure techniques and appropriately collimating the field of view reduces backscatter.1 Backscatter artifacts can be eliminated by using cassettes with lead backing. This decreases transmission of primary X-rays and blocks backscatter.1,2,4,5,7
Double Exposure
Double exposures can occur due to repeated exposure of a CR imaging plate before it being read or erased.1,5,10 It can also occur with most DR systems due to power interruptions or communication errors.10 The wide dynamic range of CR and DR allows for satisfactory display of images that are exposed to large amounts of X-rays. Double exposures often do not appear overexposed. The prominence of one superimposed image compared with the other is relative to the quantity of incident X-rays during each image acquisition (Fig. 6).1,5 Double exposures can be avoided by reading and erasing imaging plates after each exposure, providing a reliable power supply, and using a secure mode of data transfer.
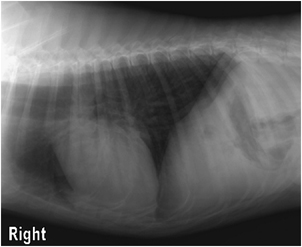
Double exposure. Right lateral thoracic radiograph of a dog. Two separate exposures of the thorax were made using appropriate exposure techniques and are superimposed over each other. The wide dynamic range of digital radiography avoids the double exposure from appearing overexposed. Remedy: Read imaging plates after each exposure.
Dead Pixels
In DR, detector arrays have multiple detector elements that are recognized as nonfunctional when manufactured. They are referred to as dead pixels.11 Blurring techniques are programmed to compensate for only the faulty detector elements. With time and use, additional detector elements may fail. The dead pixels may appear as white spots superimposed over the same location on every image. When an excessive number of dead pixels are present, the detector array can be recalibrated so as to blur the nonfunctional detector elements. If image quality becomes unacceptably decreased due to dead pixels and the blurring techniques subsequently employed, the detector array may require replacement. Detector element failure may also lead to loss of an entire column of data depending on the method of detector array readout and nature of the malfunction. Correction for loss of a column of data due to dead pixels requires different interpolation techniques or detector array replacement.11
Postexposure Artifacts (Table 3)
| Artifact | Hardware | Appearance | Cause | Remedy |
|---|---|---|---|---|
| Fading | CR | More white radiographDecreased overall image quality | Prolonged time between exposure and reading | Read imaging plates shortly after exposure |
| Light leak | CR | Partial image erasureDecreased image quality | Imaging plate subjected to ambient light | Read imaging plates shortly after exposureAvoid handling imaging plates before readingExercise proper cassette maintenance |
- CR, computed radiography.
Fading
X-rays incident upon a CR plate excite the photostimulable phosphor within it, which is usually europium-doped barium fluorohalide.11 The amount of molecule excitation is proportionate to the number of X-rays striking the plate, and the distribution of excited molecules defines the latent image.11 After prolonged periods of time, the excited molecules return to a neutral state. Fading occurs due to the gradual decrease in molecule excitation, resulting in a lighter image of decreased quality (Fig. 7).5 Noticeable fading can be produced with storage of exposed imaging plates for several days before image reading. Imaging plates with more stable phosphors are less susceptible to losses in stored energy over time.5 All imaging plates should be processed shortly after exposure to decrease the possibility of fading.
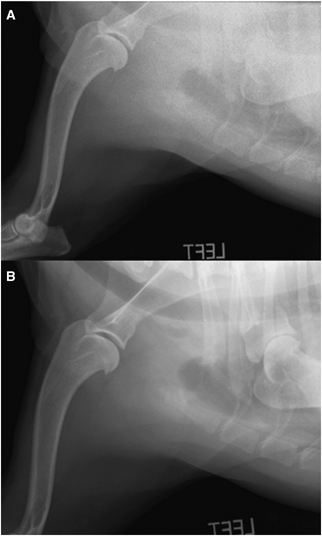
Fading. Mediolateral radiographs of the shoulder of a dog. Two radiographs were taken using the same exposure technique. (A) The first cassette was stored in an area protected from extraneous radiation for 1 week before being read. There is nonuniform information loss throughout the image. The image is grainy and there is an overall decrease in quality. Remedy: (B) Radiographs read immediately after exposure do not exhibit fading.
Light Leak
After the reading process, CR systems erase imaging plates by exposure to bright light. If the imaging plate is subjected to ambient light between X-ray exposure and reading, it can be erased. The degree of erasure is dependent upon lighting conditions and the duration of light exposure. As noted with imaging plates subjected to varying light intensities for several minutes, there is a decrease in S:N and overall image quality.3 The portion of the imaging plate subjected to light leak appears lighter due to partial release of stored energy in these areas (Fig. 8). More stable imaging plates are less susceptible to this artifact. The effect is opposite of that expected for film-screen radiography, in which light exposure increases optical density. A light leak artifact may be created when addressing a jammed, unread imaging plate in an imaging plate reader. Opening a cassette before reading or a damaged cassette that does not close properly can be a source of light leak. Light leak artifacts can be minimized by promptly reading imaging plates after exposure. Routine cassette and imaging plate reader maintenance is recommended.
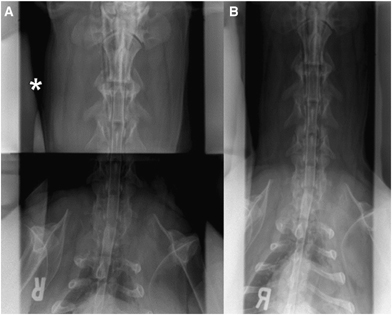
Light leak. Dorsoventral radiographs of the cervical spine of a dog during myelography. (A) Before the imaging plate was read, half was exposed to ambient light for approximately four minutes (asterisk). Its partial erasure is evidenced by overall lightening, decreased image quality, and a grainy appearance. The opposite half of the radiograph was unaffected. Remedy: (B) Reading the imaging plate shortly after each radiographic study and avoiding exposure to ambient light prevents light leak artifact.
Reading Artifacts (Table 4)
| Artifact | Hardware | Appearance | Cause | Remedy |
|---|---|---|---|---|
| Debris | CR | White dots or lines | Debris blocks emitted light from imaging plate during reading | Clean imaging plates routinely and as needed |
| Dirty light guide | CR | White line in the direction of imaging plate movement during reading | Dirt on light guide blocks laser from striking the imaging plate | Perform scheduled reader maintenance Clean light guide as needed |
| Skipped scan lines | CR | Omission of image information perpendicular to the direction of image plate movement during reading | Abrupt movement of imaging plate during reading Power fluctuation | Avoid contact with reader during imaging plate readingProvide reliable power supply |
| Unequal phosphors | CR | Lightened imageDecreased overall image quality | Use of imaging plates and image plate reader of differing peak wavelength | Use imaging plates and readers designed to be used together |
- CR, computed radiography.
Debris
The appearance of debris associated artifacts using film-screen and CR are similar.1,8 An important difference lies in the process of their creation. Imaging plates are exposed directly by X-rays, without the use of intensifying screens. Debris within the cassette during exposure usually does not noticeably attenuate X-rays. However, if debris is present on the imaging plate during the reading process, it can block light emitted from the imaging plate from reaching the photomultiplier tube.7,8 The area over which light is blocked is processed as being devoid of stored energy and is displayed on the radiograph as a white area in the shape of the debris (Fig. 9).4,7,8 Routine imaging plate cleaning and removal of identified debris will reduce these artifacts. The imaging plate manufacturer should be consulted for cleaning guidelines. Cleaning schedules often depend on the nature of imaging plate use and storage.4,7
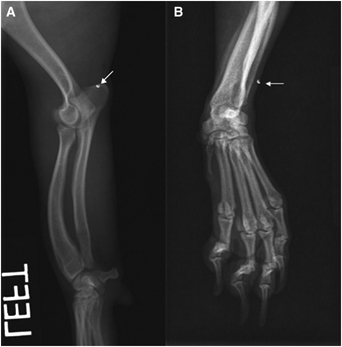
Debris. Mediolateral radiograph of an antebrachium (A) and dorsopalmar radiograph of a manus (B) of a dog. A small piece of debris was adhered to the imaging plate during reading of both of the radiographs. A small white area (arrows) was present on the radiographs until the imaging plate was cleaned. Remedy: Practice routine image plate maintenance and clean as needed.
Dirty Light Guide
In CR, light emitted from the imaging plate during the reading process can also be blocked within the light guide. Dirt on the light guide can block emitted light from reaching the photomultiplier tube in a line along the length of the image.4,7 It appears as a white line oriented in the direction of imaging plate movement during the reading process (Fig. 10).7,10 It is usually recommended that the light guide be cleaned monthly. Imaging plate reader cleaning and maintenance should be performed routinely and as needed to reduce this artifact.4
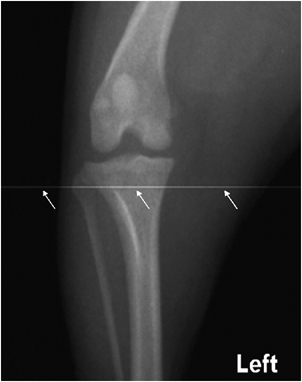
Dirty light guide. Craniocaudal radiograph of the left stifle of a dog. Dirt on the light guide creates a white line along the length of the image (arrows) in the direction of image plate movement. Remedy: Practice routine image plate reader maintenance and clean the light guide as needed.
Skipped Scan Lines
The imaging plate is struck by a laser and read one line at a time. The placement of each line in a CR image is reliant upon the continuous movement of the imaging plate through the reader at a constant, predetermined speed. Any interruption in the continuous motion of the imaging plate can cause scan lines to be skipped or distorted.8 This artifact results in image foreshortening due to omission of a short segment of information and has also been referred to as zipper artifact.1 Skipped lines are perpendicular to the direction of image plate motion. This can be due to physical jarring of the image plate reader or an abrupt alteration in supplied power.1 The width of omitted image lines may be represented by a white band parallel to the skipped scan lines at the trailing border of the image.1 Providing a stable, reliable power supply and avoiding jarring the imaging plate reader will decrease skipped scan lines.
Unequal Phosphors
During the reading process, an exposed imaging plate releases stored energy in the form of light to create a CR image. The wavelength of this light has a peak intensity characteristic of the energy storage molecules in the imaging plate. The imaging plate reader will function most efficiently when the reading laser wavelength is equal to the wavelength of imaging plate peak intensity.9 Mismatched plates and readers may lead to overall image lightening or degradation.5 Even though unequal phosphor artifact has not been produced experimentally, it remains recommended that imaging plates of specific peak wavelength are used only with their corresponding imaging plate readers.5
Workstation Artifacts (Table 5)
| Artifact | Hardware | Appearance | Cause | Remedy |
|---|---|---|---|---|
| Diagnostic specifier | DRCR | Decreased overall image qualityPoor image contrast | Incorrect region of interest designated for postacquisition processing | Select correct region of interest for each exposure |
| Moiré | DRCR | Parallel, curved, or wavy lines of increased attenuation | Interference of grid lines and sampling frequency | Use oscillating gridUse grid with high ratioAlign grid perpendicular to sampling direction Increase exposure time if needed |
| Border detection | DRCR | Image borders placed within the region or interestIncorrect image post-processing | Exposure off-centered on cassetteHighly attenuating objects in area of interest Automatic image analysis | Center the area of interestUse semiautomatic image analysis |
| Faulty transfer | DRCR | Loss or distortion of the image | Loose cable connectionPower fluctuation | Use a reliable transfer method and power supply |
| Misplacement | DRCR | Incorrect localization of sections of the image in the radiograph | Loose cable connectionPower fluctuation | Use a reliable transfer method and power supply |
| Überschwinger | DRCR | Dark zone surrounding highly attenuating objects | Unsharp masking techniques used to accentuate object borders | Use moderate settings and kernel size to increase object contrast |
| Density threshold | DRCR | Darkening and decreased contrast of lesser attenuating structures | Inclusion of high-density objects in histogram analysis and image grayscale | Create density threshold to exclude metallic objects from histogram analysis |
- DR, digital radiography; CR, computed radiography.
Diagnostic Specifier
Different anatomic regions are best displayed when image-processing parameters are designed for the specific region of interest.10 The processing parameters are defined during CR or DR equipment set-up and can be unique for each type of study performed. Common parameters include contrast, brightness, sharpness, edge enhancement, and density threshold. Incorrect diagnostic specifier selection may result in suboptimal image processing and radiographic quality (Fig. 11).5,8 The diagnostic specifier can digitally label the image respective to the anatomic region, making incorrect selection readily identifiable.5,8 Images can be corrected by reprocessing the image data or by compensatory manual processing.5 The correct diagnostic specifier should be selected before each exposure for desired processing and display.
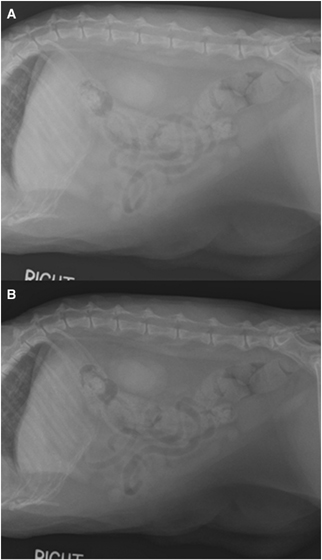
Diagnostic specifier. Right lateral radiographs of the abdomen of a cat. Radiographs were acquired using the same exposure technique. (A) One radiograph was labeled and processed under the setting for a thorax. There is poor contrast between tissue of fat and fluid opacity. Remedy: (B) When labeled and processed under the settings for an abdomen, the image is correctly displayed, maximizing the radiographic differences between tissues in the region of interest.
Moiré Pattern
CR and DR images are read at a sampling frequency defined by the linear arrangement of pixels by the equipment used. Within the image, a static grid appears as parallel lines of increased attenuation corresponding to the grid's line density. When the grid is angled, the sampling frequency intersects the grid lines in a regular distribution. This is more common with grids of low line density that are mildly divergent from the sampling direction or plate reader scan lines. The intersection of grid and sampling frequency creates numerous sequential points of higher attenuation that are regularly spaced throughout the image.12 The arrangement of these points may appear as straight or wavy lines of increased attenuation superimposed over the image (Fig. 12).8,10,12 The lines may be at an angle different from that of the grid and of differing thickness. This artifact is also referred to as corduroy artifact.10 It can also be created when imaging any object of regularly repeated attenuation, such as metallic coils in anesthetic or monitoring equipment.8 Moiré artifact can be reduced or eliminated by the use of an oscillating Potter-Bucky grid.4,7 However, this artifact has been produced with oscillating grids when using a short exposure time. Stationary grids should be oriented perpendicular to the plate reader or detector array scan lines and be in accordance with the manufacturer's specifications.4,7 Image blurring and band-stop Gaussian filters have also been employed to reduce Moiré artifact.12 However, blurring techniques and filters usually decrease image detail.
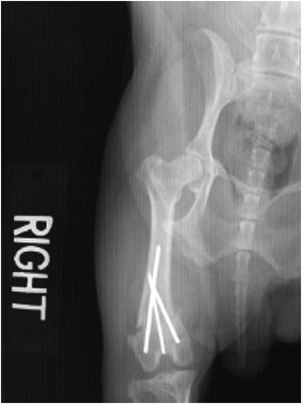
Moiré. Postsurgical craniocaudal radiograph of the right femur of a dog. Interference of the grid and sampling frequencies has created lines of increased attenuation superimposed over the entire image. The thickness and orientation of the lines does not correspond to that of the grid. Remedy: Use oscillating grids or stationary grids with high grid ratios oriented perpendicular to the scan lines.
Border Detection
The initial step of processing any DR or CR image is determining the area of the image to be analyzed. Border detection can be performed in one of three modes: automatic, semiautomatic, and fixed. Workstations in automatic mode identify collimated borders of the image using applications such as Agfa's CR QS Black Border and ROIfinder software. Image borders may be incorrectly recognized if the imaging plate and the field of view are nonparallel by more than 3°.1,5 Other causes of border detection failure include division of an imaging plate for multiple exposures, an off-centered object of interest, and highly attenuating linear objects such as bone or metallic implants.10 The image may be incorrectly cropped, placing a border through the region of interest. Border detection failure may also result in incorrect image analysis and cause a decrease in image quality (Fig. 13).1,5,8 In semiautomatic mode, only a central portion of the image is included during analysis. The object of interest must be within the central location for its inclusion in appropriate image processing. In fixed mode, the computer neither analyzes nor alters the image. Fixed mode can be applied when variable postexposure processing is not necessary. Properly centering the object of interest and semiautomatic image processing is recommended for most studies and reduces the frequency of border detection artifact.
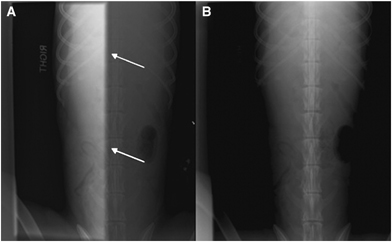
Border detection. Ventrodorsal radiographs of the thoracolumbar spine of a dog during myelography. (A) Automatic border detection methods incorrectly identified the linear increase in attenuation of the spine as the margin of the radiograph (arrows). The image was cropped to include the patient's right half, which was used for image analysis. Remedy: (B) Reprocessing the image or repeating the exposure with improved alignment and semiautomatic border detection methods will reduce this artifact.
Faulty Transfer and Misplacement
Digital and computed radiographs that are acquired correctly may still appear distorted if there are errors in image data transfer to the workstation. Multiple pixels or lines may be altered, missing, or replaced by electronic noise. The image or a portion of the image can appear elongated or can be replaced by bars of varied shades of gray (Fig. 14). Overall image quality and contrast can also be decreased. This can result from memory, digitization, or communication errors.10 During misplacement, the radiograph is fragmented and separate fragments are incorrectly located within the image (Fig. 15). Fragments correctly represent the object of interest, but are misplaced in either a recognizable or seemingly random pattern. The fragments may be multiplied and are often superimposed over each other. Faulty transfer and misplacement artifacts are not unique to either hardware or software. Poorly fitted data transfer cables and fluctuations in power can lead to intermittently distorted images. Often, immediate repeat exposure will result in an image without artifact. Appropriate workstation set-up, reliable data transfer, and provision of a steady power supply reduce faulty transfer and misplacement artifacts. Scheduled preventative maintenance is recommended, and necessary repairs should be performed if this artifact persists beyond isolated incidences.
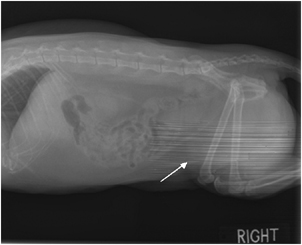
Faulty transfer. Right lateral radiograph of the abdomen of a cat. Longitudinal streaks of alternating shades of gray (arrow) are superimposed over the caudoventral aspect of the patient. This was caused by an error during image transfer due to a loose data cable. Remedy: Subsequent exposures may be devoid of artifact. Provide a reliable method of data transfer and power supply.
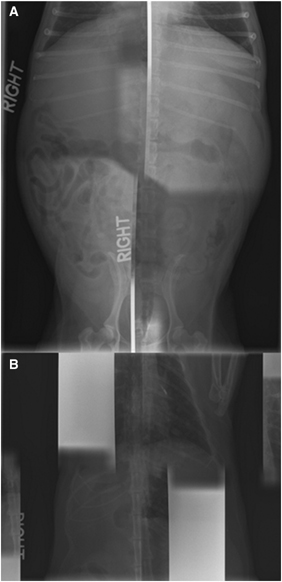
Misplacement. (A) Ventrodorsal radiograph of the abdomen of a dog and (B) ventrodorsal radiograph of the thorax of a cat. Sections of the images have been incorrectly located within each image. Some sections have been duplicated and/or superimposed over other sections. Remedy: Subsequent exposures may be devoid of artifact. Provide a reliable method of data transfer and power supply.
Überschwinger
The increased dynamic range of DR and CR is often accompanied by a decrease in image contrast.10 Image manipulation can be used to accentuate the margins of indistinct opacities and improve contrast. This is commonly performed by unsharp masking techniques. Unsharp masking is an edge enhancement algorithm that creates a border at the interface between structures of differing attenuation.1,7,8,13 The dark border that surrounds highly attenuating objects is referred to as überschwinger, halo artifact, or rebound effect and this has been recognized in veterinary imaging.8,13,14 The prominence of the surrounding dark border varies with kernel size selected during unsharp masking and the difference in attenuation between adjacent objects.7Überschwinger is often present surrounding metallic orthopedic implants (Fig. 16). It can be differentiated from pathologic changes because überschwinger is uniform in thickness, conforms to the shape of the object, and is present at other similar interfaces. Überschwinger becomes less pronounced with decreases in edge enhancement.1,13 Minimal use of edge enhancement is recommended when imaging body regions containing metallic implants.
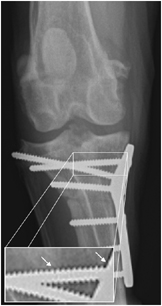
Überschwinger. Craniocaudal radiograph of the stifle of a dog. A dark halo is present surrounding the metallic implants (arrows). It is of equal thickness throughout the image and parallels the contour of the implants. Remedy: Use moderate levels of unsharp masking or process images without edge enhancement filters.
Density Threshold
Highly attenuating objects within the image are designated extremely high pixel values on the DR or CR histogram.7 The image is assigned a long gray scale when these extreme values are incorporated into image analysis. The highly attenuating object is assigned the maximum gray-scale value. The remaining objects in the image are near the minimum of the gray scale and do not contrast each other well (Fig. 17). This is referred to as a density threshold artifact and may be encountered when metallic objects are present within the image.5,8 When processing an image, a maximum and/or minimum pixel value included in image analysis can be designated.5,8 Setting a maximum density threshold to exclude metallic objects will exclude their corresponding extremely high pixel values from image histogram analysis. The image will be processed with the limited inclusion of biologic opacities, optimizing gray scale and contrast between tissues. The density threshold should be selected during equipment set-up.
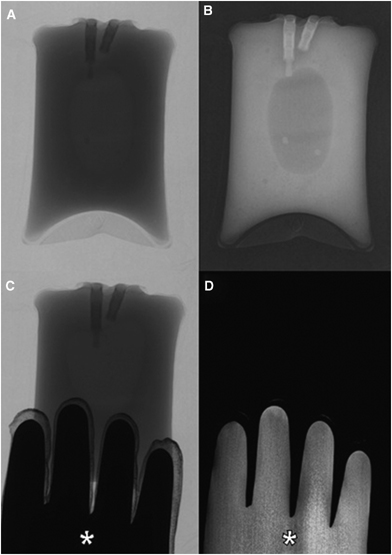
Density threshold. Radiographs of a bag of intravenous fluid were made using 60 mAs and 6.0 kVp before and after inclusion of a lead glove (asterisks). (A) The unprocessed negative image and (B) processed positive image of the fluid bag alone demonstrate shades of gray attributed to the object of interest and appropriate contrast throughout the image. (C) In the unprocessed negative image of the bag of fluid and lead glove, the fluid bag is similar in appearance. (D) In the positive image, the lead glove was included in analysis and image processing. The fluid bag is depicted by very dark, indiscernible shades of gray and is not identifiable. Remedy: Programming a density threshold to exclude high-density, nonbiologic objects will allow for maximal tissue contrast and image quality.
Conclusion
Artifacts may be commonly encountered when using any of the currently available digital radiography systems. Cassette-based photostimulable phosphor systems implement a greater number of steps in the imaging process that may be susceptible to the creation of artifacts. Preexposure, postexposure, and reading artifacts are unique to the systems marketed as CR. Most digital radiography artifacts differ from those seen with film-screen radiography. Even when similar, the high sensitivity and increased dynamic range of digital radiography systems makes them more vulnerable to certain artifacts and may alter their presentation.
The appearance of many artifacts is attributable to the preferences chosen during workstation set-up. These preferences should be carefully selected for each type of radiographic study at each workstation. Processing parameters do not directly alter the image data but do change how the image data are displayed. Many workstation artifacts can be corrected without repeating the radiographic study. Initial and scheduled calibration of digital radiography equipment as well as appropriate scheduled maintenance will help provide consistent, high-quality images.8,10 Provision of a stable, reliable power supply and method of data transfer is necessary. Faulty software or hardware should be fixed or replaced.
ACKNOWLEDGMENT
The authors thank Amy C. Dixon-Jiménez, DVM, for her support and contribution in reviewing this manuscript.


