Certification of additively manufactured materials for maritime application
Abstract
For additive manufacturing (AM) products such as structural and machinery components, the quality should be verified. In maritime industry, this task is performed by classification societies who are acting as independent third party and certifying such components. In the case of, eg, cast-steel products, standards are available, which specify sampling procedures, properties, and destructive and nondestructive test methods as well as relevant material requirements for design purposes. For AM products, currently only few supportive standards are available. In tough market situation products must be cost-efficient. Therefore, mandatory verification of products can only be enforced for vital applications. Unified, meaningful sampling and testing scopes are needed for application at different manufacturing locations and for evaluation by “no AM expert” staff. The impact of manufacturing defects in the AM process on the integrity on the AM product has to be evaluated. Contract partners may, or have to ask for evidence for the integritiy of AM products by certificates issued by third-party institutions. DNV GL as a classification society has set up procedures for initial qualification and certification of AM products. This paper focusses on inspection and certification of AM maritime products and fit-for-purpose assessment.
1 INTRODUCTION
Additive manufacturing (AM) is entering the maritime industry, too. The common product certification had been developed for conventional processes such as casting or forging. The qualification processes need to be adapted in order to comply with the characteristics of AM. In the following, the qualification of products in maritime industry is displayed by the example of a cast-steel propeller. Subsequently, a possible qualification scheme for an AM propeller is deduced.
2 METHODS AND RESULTS
2.1 Material processed by conventional methods
The steel grade designation 1.4404 according to EN 10088-2(2014)1 applies to a rolled austenitic steel grade with specific chemical composition. This steel can also be cast, forged, and additively manufactured with identical chemical composition and is suitable for cast-steel propellers.
Different manufacturing processes result in different material properties. In casting, due to the solidification process and the heat flow in the cooling process, the developed microstructure is different for locations close to the surface and for locations in the centre of the casting. Accordingly, the obtained material properties will vary over the thickness of the casting. For quality control during the production, from, eg, cast on samples, tensile specimens will be extracted and subjected to testing. However, one has to be aware that the obtained tensile properties are only partly representative for the casting.2 For design calculations, uncertainties and varying properties of the material are considered in terms of safety factors.
Standards comprise information required for the manufacturing process and testing. They are based on experience gained by considerable amount of manufactured products over a longer period. Typically, standards specify, eg, minimum values or ranges for mechanical properties. Table 1 states the specified mechanical properties from standards1, 3, 4 and rules5 for rolling, forging, casting, and AM for austenitic steel grades with (nearly) identical chemical composition. Delivery condition for all processes, except AM, is solution-annealed at about 1100°C.
| Tensile Test | Notch Bar Impact Test | |||||
|---|---|---|---|---|---|---|
| Manufacturing Process and Chemical Designation [Standard] | Proof Strength | Tensile Strength [MPa] | Elongation After Fracture [%] | Impact Energy [J] at 20°C | ||
| Rp0.2 min. [MPa] | Rp1.0 min. [MPa] | Rm range/min. | A min | KV min | ||
| Rolled/1.4404 [1] | 220 | 260 | 520-670 | 45 | 100 (L) | 60 (T) |
| Forged/1.4404 [3] | 200 | 235 | 500–700 | 30 | 100 (L) | 60 (T) |
| Cast/1.4409 [4] | 195 | 220 | 440 | 30 | 80 | |
| Cast propeller/VL C19Cr11Ni [5] | 180 | - | 440 | 30 | - | |
| Additive manufactured/1.4404 | - | - | - | - | - | |
Materials processed by AM exhibit properties disparate to conventionally processed materials: The AM microstructure is influenced by characteristics such as melting and solidification of the melt pool, dendrite growth, and as grain growth rate and direction. The latter results in profound anisotropy of mechanical properties. Common defects in AM such as porosity and lack of fusion are areas with high stresses and accordingly have a detrimental effect on mechanical properties.6 In comparison with conventional manufacturing processes, unified acceptance criteria for defects are not yet established. In numerous publications and by testing, actual achieved mechanical properties are reported. However, standards which would support a pragmatic procurement and related certification or testing requirements have not yet been published.
2.2 Determination of properties relevant for AM material
Designers usually require only proof and tensile strengths for configuring sufficient dimensions of a component for the intended application, eg, a ship propeller. But, in order to verify the quality of a processed material, further material properties are required, such as elongation at fracture obtained by tensile testing, impact energy for an envisaged low temperature application, corrosion resistance, and fatigue strength. The nature of AM material, ie, microstructure created by powder particles or by weld layers, may be sensitive to dynamic loading. High surface roughness, surface defects, and sub-surface defects (such as porosity and lack of fusion) cause reduction of fatigue strength.6, 7 In order to ensure a reliable behaviour in service, the determining properties for AM material have to be identified and verified by testing. For a propeller, this would comprise—in addition to tensile testing—loading acting due to cavitation effect (water hammering effect) and behaviour of material in sea water condition, which both are to be demonstrated and tested in full function load.
2.3 Certification process for components intended for maritime application
For components which are vital for the safety of a ship, eg, for manoeuvrability, it is of utmost importance that material and functional properties are faultless. This has to be demonstrated by the manufacturer by an initial elaborate qualification (manufacturer approval) and during production with specific destructive testing and nondestructive testing (NDT) (acceptance tests).
By test scopes specified in rules from designated institutions, unified and clear test procedures with unified requirements for the products are established and which are independent of the geographical location of the manufacturer's site and repeatable at other manufacturers.
Certification requirements in maritime industry are based on risk assessment. Such assessment takes into account (a) the importance of the components, (b) the technology maturity, and (c) the service experience. Up to now, established standards and plenty of service experience are available for rolled, cast, and forged components, whereas for AM products, sufficient service experience is not given. Risk assessment performed according to previous works8, 9 for conventional processes and AM process results in the risk matrixes given in Table 2. Certification levels 1 to 3 are stated here by documents according to ISO 10474,10 which is commonly used in industry and which is similar to the certification requirements as per previous work.5
| Conventional Processes: Rolling, Casting, and Forging | AM Process | ||||||
|---|---|---|---|---|---|---|---|
| High risk | Ο | High risk | Ο | ||||
| Medium risk | Ο | Medium risk | Ο | ||||
| Low risk | Ο | Low risk | Ο | ||||
| Risk level ↑ | Level 1 | Level 2 | Level 3 | Risk level ↑ | Level 1 | Level 2 | Level 3 |
| Certification level → | Certification level → | ||||||
- Level 1: Test report by manufacturer—nonspecific inspection with document 2.2.Level 2: Inspection certificate validated by the manufacturer's authorized representative—specific inspection with document 3.1.Level 3: Inspection certificate validated by the manufacturer's authorized representative and the purchaser's authorized representative—specific inspection with document 3.2.
When a shipyard places an order for a propeller at a foundry, it also specifies the applicable certification level prescribed by, eg, the corresponding rules as per previous work.5
The testing requirements, the obtained results, and the compliance of the product with the envisaged requirements are comprised in the certificates accompanying the finished product. This is also due to traceability and quality assurance reasons: the certificates are filed, in case further evaluations may be necessary in future, such as refurbishing by welding or investigation of failures occurring during ship's lifetime (usually 30 years).
2.4 Test requirements for conventional, ie, cast propeller blade
- Initial qualification of the manufacturer: by verification of quality control system, personnel qualifications, prototype testing, etc.
- The manufacturing process: eg, moulds, melt treatment, casting process, and heat treatment.
- Testing and inspection of the final product, like chemical composition, mechanical properties, and NDT.
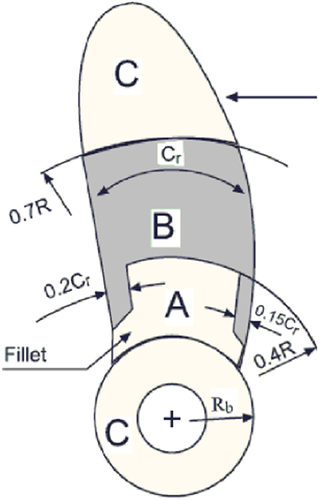
- Zone A: region where operation stresses are high.
- Zone B: region where operation stresses may be high.
- Zone C: region where operation stresses are low and the blade thicknesses relatively small.

These and other requirements given by DNV GL rules5 have been developed over time and are based both on theoretical considerations and on experienced failures and successes.
2.5 Considerations for AM metals subject to certification
Propellers are appealing to be additive manufactured: When manufactured by conventional casting, the design has to consider the specialties of the casting process, which encumbers design optimization for the intended application. By AM, the design for the propeller has enhanced flexibility, eg, by implementing hollow spaces the weight can be reduced significantly.
For verification of properties for a propeller manufactured by AM, sampling and test scope according to standards such as EN 102834 probably do not suffice to ensure the envisaged properties all over the propeller. For manufacturing by wire added additive manufacturing (WAAM), standards such as ISO 15614-111 and ISO 15614-712 for qualification of welding procedures may serve as guidance.
ISO 15614-111 is actually applicable for build-up welding, ie, addition of weld metal for obtaining or restoring required dimensions. ISO 15614-712 is valid for overlay welding, ie, surfacing by means of welding. Required test scopes according to ISO 15614-111 and ISO 15614-712 are depicted in Tables 3 and 4. The welding procedure tests according to both standards are established since many years in maritime industry. Defined test pieces are available as well as relevant test procedures and acceptance criteria. However, for AM, the entire component consists of weld metal which needs assessment.
| Test Piece | Type of Test | Extent of Testing |
|---|---|---|
| Butt joint with full penetration | Visual testing | 100% |
| Radiografic or ultrasonic testing | 100% | |
| Surface crack detection | 100% | |
| Transverse tensile test | 2 specimens | |
| Transverse bend test | 4 specimens | |
| Impact test | 2 sets | |
| Hardness test | Required | |
| Macroscopic examination | 1 specimen |
| Test piece | Type of Test | Extent of Testing |
|---|---|---|
| Corrosion resistant overlay welding | Visual testing (VT) | 100% |
| Ultrasonic testing (UT) | 100% | |
| Penetrant testing (PT) | 100% | |
| Side bend test (SBC) | 2 specimens | |
| Macroscopic examination | 1 specimen | |
| Chemical analysis | 1 specimen | |
| Delta ferrite content/ferrite number (FN) | 1 specimen | |
| Hardness testing | 1 survey |
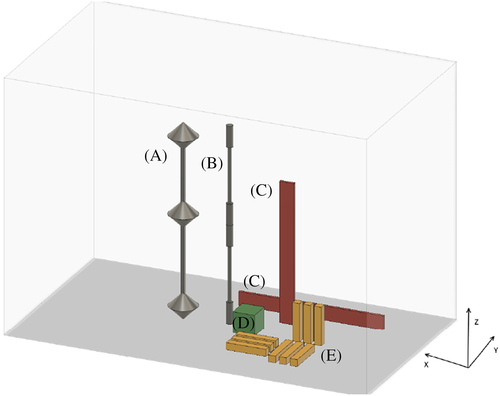
Further, in order to ensure repeatability of the material properties, also the feedstock—such as metal wire or powder—needs qualification. For this, the standard EN ISO 1434313 for qualification of welding consumables may serve as basis. But in addition, determining parameters such as powder grain size, distribution, density, and flow rate need to be specified and verified during production. A combination of the above qualification standards with further conventional, or new developed tests, may be a feasible way for qualification of AM products in maritime industry. DNV GL has set up pertinent requirements and guidance with the class programme for AM approval of manufacturers14 and for feedstock approval.15 A proposal for test specimens scope and arrangement for AM process qualification is shown in Figure 2.15 In addition, specimens are contained for the case of powder bed fusion (PBF) for qualification of recycled feedstock.

Special consideration has to be given to NDT: eg, ultrasonic testing (UT) is commonly applied to conventional processed materials. For AM components, in many cases, UT cannot be applied due to optimized geometry, such as slopes in wall thickness, radii, or non-accessible surfaces. A solution may be computer tomography (CT). However, CT up to now is not stipulated for cast maritime components, and reasonable acceptance criteria are not yet standardized, and thus need to be developed. One has to bear in mind that due to the tough market competition in maritime industry, only such tests will be enforceable which are mutually understood to be vital for the integrity and functionality of AM components.
An additional challenge are the considerable parameters originated by the digital processes. Data for CAD model, 3D model, check for misalignments, welding sequence, build layout with orientation and support structures, etc may all affect the properties of the AM component, and must be filed and retrieveable, due to required traceability and quality assurance reasons. Such parameters usually will not be evaluated by personnel mandated with acceptance tests during production. Therefore, thorough examination in the course of the initial AM manufacturer approval is stringent and as one outcome holds points for the evaluation of the AM production is needed.
Currently, DNV GL is involved in several maritime projects, where by mutual evaluation and discussion between AM manufacturers, appliers of AM components and DNV GL as independent third party, assessment, and performance criteria are developed. As it is obviously favoured to establish AM components for maritime industry, institutions involved in standardization need to act swiftly in developing appropriate standards.
3 CONCLUSIONS
Available standards for conventional manufacturing may serve as basis for qualification of AM products for maritime industry but are not sufficient. Thus, amendment of requirements from standards, definition of reasonable scopes for destructive testing, and NDT and qualification schemes for manufacturers have to be developed. Rules and certification schemes for AM have been set up, and products may be certified. However, further details for qualification have to be specified and have to be performed simultaneously with the increasing service experience gained.
CONFLICT OF INTERESTS
The authors of this paper declare that there is no conflict of interest.
AUTHOR CONTRIBUTION
The authors of this paper declare that they have contributed to the work as required by the Wiley Online Library Author Guidelines.
REFERENCES
Abbreviation: AM, additive manufacturing.


